
Summary:
In this post I
– Specified my plan for this test shoot
– Included an image of all of the test shots
– Before analysing each one briefly to discuss what went right and wrong if anything
– Wrote a short reflection on the shoot as a whole and how I will move forward
To figure out whether my Instax Mini 8 camera was going to be suitable enough for this assignment, a few test shots had to be taken to experiment with the different settings available.
5 sheets of film were left in the pack so featured below are the images achieved with such a limited amount of film.
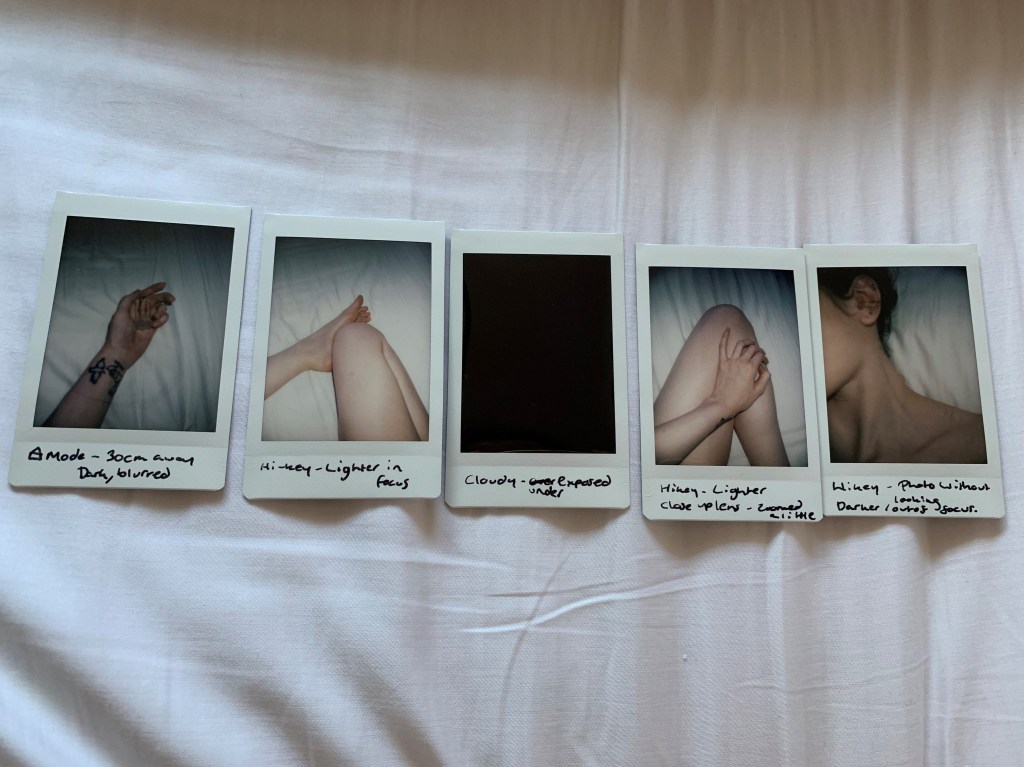
The furthest image to the left (see Fig.1.) was taken with the suggested lighting mode on the Instax Mini 8 camera. As I was indoors away from direct sunlight during the late afternoon, the night/indoor meter lit up to make sure the exposure was suitable for this location. In terms of camera distance to the subject, was roughly 30cm if not less to prevent the picture from being out of focus once developed. To centralise the subject, it is suggested that you tilt the camera slightly to the right as the viewfinder shows a slightly different version of what will be shot and printed. As we can see, the image is slightly too dark and out of focus by a short margin.
For the second image, I referred to an article by Adorama that provided settings from brightest to darkest along with apertures for each one. The Hi-Key setting is the brightest of all lighting choices, resulting in a lighter and softer image (Adorama, 2021). I changed the camera settings to Hi-Key and repeated that same process as before, but changed the subject matter. The image was brighter, evenly balanced tonally and more in focus than the first shot.
The middle shot was a failed attempt as it was heavily underexposed. Using the cloudy setting indoors is not a wise move.
The shot second from the right was once again taken using the Hi-Key light setting but instead of using the camera as it was, I decided to add the close-up lens filter to see if it made a significant difference to the framing. The crop was very slight and pulled the subject closer to the lens, but only by a small distance. Lighting wise, the composition was even throughout and well lit minus a slight vignette around the edges. I wouldn’t say the lens filter made enough of a difference to use it for this project, however, it was worth testing.
I removed my ability to see the subject in the last image, by taking a picture in ‘selfie’ style. This is a challenging way to take an image at the best of times if you don’t have a clear view of the camera screen, but it’s even worse when you can’t see what the camera is picking up at all. As shown above, the framing is off and slightly out of focus. While the photograph isn’t awful, my original plan was to take a picture of my shoulder rather than an ear and part of a neck!
Reflection
The best course of action for taking images indoors would be to use the Hi-key light setting during the early morning or afternoon. Keeping the lens as intended prevents any further vignetting, as it doesn’t affect the ‘zoom’ much at all. Being able to see what the viewfinder can see is more ideal in terms of achieving a well-framed image, however, an out of focus centre image adds a bit of character and secrecy to the shot.
References
Adorama. (2021) How to Use the Fujifilm Instax 8 [online] Available at: https://www.adorama.com/alc/how-to-use-the-fujifilm-instax-8-everything-you-need-to-know/ [Accessed 14 June 2021].
List of images
Figure. 1. Powell, L. (2021) Test shots [image] In possession of: Lauren Powell: Eastleigh.
