
Summary:
In this post I have
– Explained the short exercise and how to set up the camera.
– Described my camera and subject set up.
– Included images and histograms from auto-mode with a brief conclusion about what I found.
– Before repeating the exercise again with manual mode, inserting the images and histograms to explain the differences between auto and manual.
– Briefly concluded this exercise, what I discovered and how it’s helped me learn.
‘If you’re not completely sure how your light meter works, try this exercise. Set your camera to
any of the auto or semi-auto modes. Photograph a dark tone (such as a black jacket), a mid-tone
(the inside of a cereal packet traditionally makes a useful grey card) and a light tone (such as a
sheet of white paper), making sure that the tone fills the viewfinder frame (you don’t have to
focus)‘ (Bloomfield 2018).
Albeit a short exercise, this one was an interesting one to do as I’ve never thought about the light meter within a digital camera as it’s less prominent than the one in a film camera which lets you know whether your settings are optimal or not. With digital cameras you have a screen informing you of the result you will achieve, in turn, it’s easier to forget about the light meter.
After exploring my Sony A57 settings a little further to figure out which monitoring mode my camera was set on (spot mode), I grabbed a black coat, the inside of a cereal bar box and a white sheet of paper. They were all placed in direct sunlight to make sure each setup was the same, but despite knowing from the exercise write up that ‘In auto and semi-auto modes the light meter is calibrated to the mid-tone’ (Bloomfield, 2018) I was still surprised to see that each image was dull and grey.

Fig. 1. White sheet (2021) 
Fig. 2. Grey card (2021) 
Fig. 3. Black coat (2021 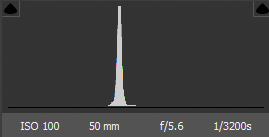
Fig. 4. Histogram 1 (2021) 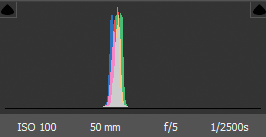
Fig. 5. Histogram 2 (2021) 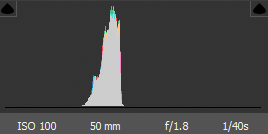
Fig. 6. Histogram 3 (2021)
Even though each image looks the same aesthetically, as shown in the histogram, there are still some differences that can be seen in the grey card and black coat histograms (see Fig. 5., and Fig. 6) which I assume represents higher exposure levels to get the darker subject to a mid-tone.
I then set my camera back to manual mode to see the difference in both the images taken and the light meter. The light meter was changing as the lens was pointing particular colours in the room, something that couldn’t be seen in auto mode and something I’ve never noticed before being made aware of it via this exercise.

Fig. 7. White sheet 2 (2021) 
Fig. 8. Grey card 2 (2021) 
Fig. 9. Black coat 2 (2021) 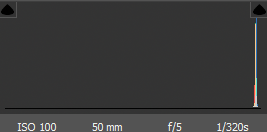
Fig. 10. Histogram 4 (2021) 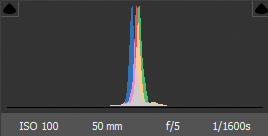
Fig. 11. Histogram 5 (2021) 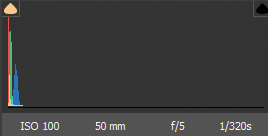
Fig. 12. Histogram 6 (2021)
The histograms for these pictures show clear differences just like each image in this set, showing the extreme whites, extreme blacks and of course the middle point with the grey card. In auto mode, we have less control over the camera settings as it makes the decisions for us based on the shooting circumstances, this can sometimes mean less dynamic images due to this inability to control aperture and shutter speed. With manual mode, we can control all aspects of the image, from the depth of field, to the exposure of the image and whether we want a dark, shadow filled image or a light, highlighted image.
This has been such an exciting exercise to explore and has helped me understand my camera much more than before. Light is so important within photography, as it can be the difference between a good and a great image.
References:
Bloomfield, R., 2018. Photography 1: Expressing your Vision. 4th ed. [pdf] Barnsley: OCA, p. 80. Available at: https://www.oca-student.com/course/photography-1-expressing-your-vision [Accessed 19 April 2021].
List of images:
Figure. 1. Powell, L. (2021) White sheet [image] In possession of: Lauren Powell: Eastleigh.
Figure. 2. Powell, L. (2021) Grey card [image] In possession of: Lauren Powell: Eastleigh.
Figure. 3. Powell, L. (2021) Black coat [image] In possession of: Lauren Powell: Eastleigh.
Figure. 4. Powell, L. (2021) Histogram 1 [Photoshop, screenshot] In possession of: Lauren Powell: Eastleigh.
Figure. 5. Powell, L. (2021) Histogram 2 [Photoshop, screenshot] In possession of: Lauren Powell: Eastleigh.
Figure. 6. Powell, L. (2021) Histogram 3 [Photoshop, screenshot] In possession of: Lauren Powell: Eastleigh.
Figure. 7. Powell, L. (2021) White sheet 2 [image] In possession of: Lauren Powell: Eastleigh.
Figure. 8. Powell, L. (2021) Grey card 2 [image] In possession of: Lauren Powell: Eastleigh.
Figure. 9. Powell, L. (2021) Black coat 2 [image] In possession of: Lauren Powell: Eastleigh.
Figure. 10. Powell, L. (2021) Histogram 4 [Photoshop, screenshot] In possession of: Lauren Powell: Eastleigh.
Figure. 11. Powell, L. (2021) Histogram 5 [Photoshop, screenshot] In possession of: Lauren Powell: Eastleigh.
Figure. 12. Powell, L. (2021) Histogram 6 [Photoshop, screenshot] In possession of: Lauren Powell: Eastleigh.
