
For this post I;
– Stated why I decided to do a test shoot before my final shoot for this assignment and what I tested during this process.
– Included the camera and lens used for this photoshoot.
– Provided annotated contact sheets to show the different tests taken, as well as the strengths and weaknesses found throughout.
– Reflected on how I achieved the shots, the image editing and the reasons for the choices made.
– Provided a summary for my final shoot plan, following the analysis of the contact sheets, stating the most beneficial techniques found.
Before shooting my final images, I wanted to test different camera settings and prop choices to decide what visual and technical styles I preferred.
Tested settings consisted of changing focal length, changing the artificial light colour, changing aperture, experimenting with camera effects such as Black and White and plate colours. Using a tripod allowed the framing to be consistent throughout and prevented motion blur from an unsteady camera if handheld.
Below are the annotated contact sheets.
Equipment used – Sony A57 and SONY 18-55 3.5-5.6 SAM lens.
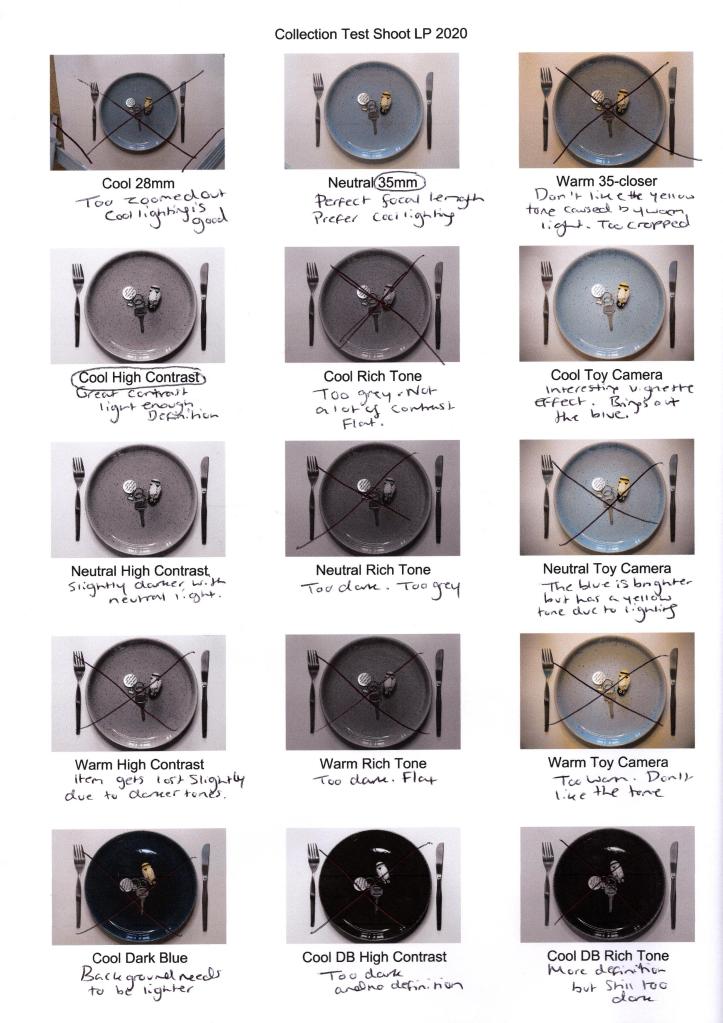
Fig. 1. Contact sheet 1 (2020) 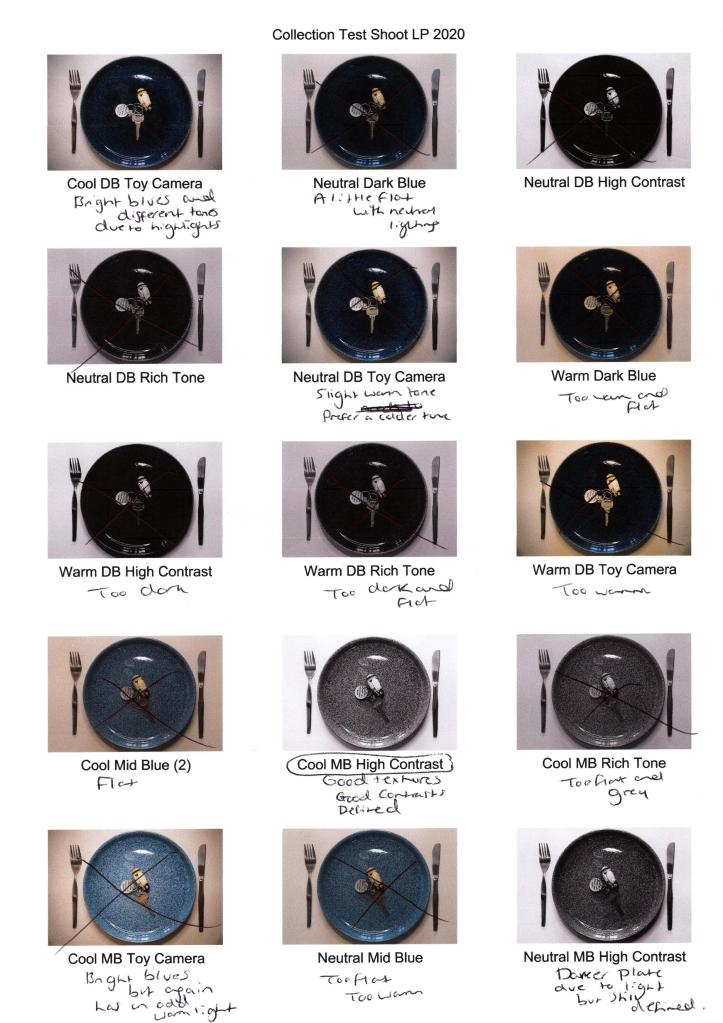
Fig. 2. Contact sheet 2 (2020) 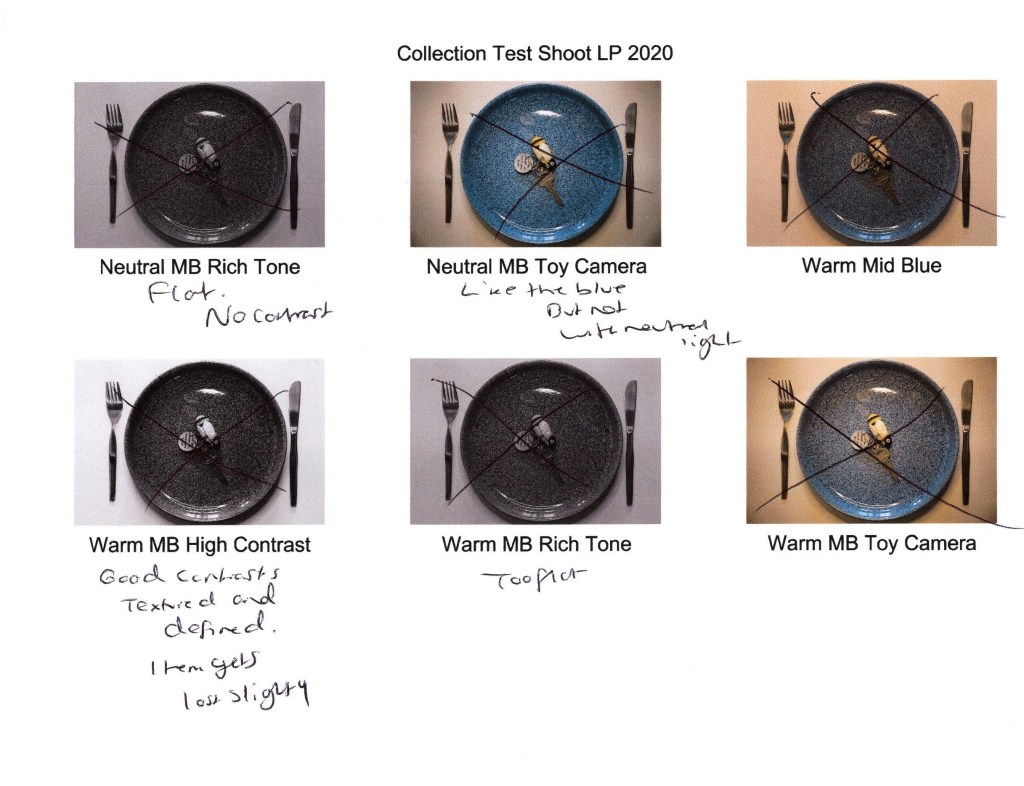
Fig. 3. Contact sheet 3 (2020)
Reflection:
Cool 28mm, Neutral 35mm and Warm 35-Closer (see Fig. 1.) tested both focal length and artificial light temperature, which was the most straightforward test shoot to decide what elements I preferred. A focal length of 28mm was too short as the tripod legs and carpet were in the frame, as well as, making it difficult to see the subject as a whole. On the other hand, the cropped version of 35mm was too long, causing the plate to sit far too tight in the frame. 35mm allows for the tripod to be out of the shot, a decent focal length for the subject to be clear and crisp while providing some negative space to open the image up slightly and feel less suffocated.
Backlighting the plate with a 10.5″ ring light formed some soft shadows, preventing the image from being 2D and lacking in contrast. While cool and neutral light is very similar in tone, choosing a cooler bulb setting made the whites brighter and defines. The warmer bulb temperature made the shadows stronger but flattened the image with an unappealing muddy pink-yellow tone. A crisp whiter background is more fitting for the props used, so a cooler light is most appropriate for these shots.
The images following the previous three discussed tested the different camera effects available on my Sony A57, such as High Contrast B&W, Rich-Tone B&W and Toy Camera, comparing the differences the lighting would have on these settings. Using High Contrast B&W with cool and neutral light, were the most successful combinations as the contrasts were sharp and added plenty of definition, as opposed to using Rich Tone B&W that flattened the subject with the greys due to the lack of tonal variations. Cool Toy Camera (see Fig. 2) has an added vignette effect, forming a halo around the plate which highlights and directs the eyes inwards while intensifying the various blues within the plate design that aren’t in the other shots.
Finally, I tested all of the plates to figure out which colour worked best with the settings. The dark blue plate was too dark and became a solid block of black with the B&W filter, no matter the light temperature. Although Cool DB Toy Camera (see Fig. 2) had various blue tones that added depth, it wasn’t impactful enough to use in the final shoot.
The design of the mid-blue plate adds an extra layer of texture to the image and enhances the contrast due to the dark flecks of paint. Cool MB High Contrast, Neutral MB High Contrast and Neutral MB Toy Camera (see Fig. 2. and Fig. 3) have the most depth out of all of the images due to the intense highlights, shadows and tonal differences in the blue, making the mid-blue plate bolder than the others. However, darker items may get lost in the composition due to the busy plate texture, so I will consider this when shooting my final images.
Final shoot plan:
– Collect as many items listed on the survey results and personal list to have varying shots.
– Use 35mm Focal Length.
– Use a tripod to steady the camera and keep framing consistent.
– Keep the plate position identical throughout to create a fluid transition between each final image.
– Use the lighter plate and mid-blue plate to avoid a dark block of colour.
– Use cool lighting to brighten the whites and darken the blacks.
– Use High Contrast B&W camera effect for depth.
– Backlight the subject.
List of images:
Figure. 1. Powell, L. (2020) Contact sheet 1 [scanned document] In possession of: Lauren Powell: Eastleigh.
Figure. 2. Powell, L. (2020) Contact sheet 2 [scanned document] In possession of: Lauren Powell: Eastleigh.
Figure. 3. Powell, L. (2020) Contact sheet 3 [scanned document] In possession of: Lauren Powell: Eastleigh.
